viernes, 22 de mayo de 2020

Takeover - SubDomain TakeOver Vulnerability Scanner


Sub-domain takeover vulnerability occur when a sub-domain (subdomain.example.com) is pointing to a service (e.g: GitHub, AWS/S3,..) that has been removed or deleted. This allows an attacker to set up a page on the service that was being used and point their page to that sub-domain. For example, if subdomain.example.com was pointing to a GitHub page and the user decided to delete their GitHub page, an attacker can now create a GitHub page, add a CNAME file containing subdomain.example.com, and claim subdomain.example.com. For more information: here


Installation:
# git clone https://github.com/m4ll0k/takeover.git
# cd takeover
# python takeover.py
or:
wget -q https://raw.githubusercontent.com/m4ll0k/takeover/master/takeover.py && python takeover.py


Related links

Recovering Data From An Old Encrypted Time Machine Backup

Recovering data from a backup should be an easy thing to do. At least this is what you expect. Yesterday I had a problem which should have been easy to solve, but it was not. I hope this blog post can help others who face the same problem.


The problem

1. I had an encrypted Time Machine backup which was not used for months
2. This backup was not on an official Apple Time Capsule or on a USB HDD, but on a WD MyCloud NAS
3. I needed files from this backup
4. After running out of time I only had SSH access to the macOS, no GUI

The struggle

By default, Time Machine is one of the best and easiest backup solution I have seen. As long as you stick to the default use case, where you have one active backup disk, life is pink and happy. But this was not my case.

As always, I started to Google what shall I do. One of the first options recommended that I add the backup disk to Time Machine, and it will automagically show the backup snapshots from the old backup. Instead of this, it did not show the old snapshots but started to create a new backup. Panic button has been pressed, backup canceled, back to Google.


Other tutorials recommend to click on the Time Machine icon and pressing alt (Option) key, where I can choose "Browse other backup disks". But this did not list the old Time Machine backup. It did list the backup when selecting disks in Time Machine preferences, but I already tried and failed that way.


YAT (yet another tutorial) recommended to SSH into the NAS, and browse the backup disk, as it is just a simple directory where I can see all the files. But all the files inside where just a bunch of nonsense, no real directory structure.

YAT (yet another tutorial) recommended that I can just easily browse the content of the backup from the Finder by double-clicking on the sparse bundle file. After clicking on it, I can see the disk image on the left part of the Finder, attached as a new disk.
Well, this is true, but because of some bug, when you connect to the Time Capsule, you don't see the sparse bundle file. And I got inconsistent results, for the WD NAS, double-clicking on the sparse bundle did nothing. For the Time Capsule, it did work.
At this point, I had to leave the location where the backup was present, and I only had remote SSH access. You know, if you can't solve a problem, let's complicate things by restrict yourself in solutions.

Finally, I tried to check out some data forensics blogs, and besides some expensive tools, I could find the solution.

The solution

Finally, a blog post provided the real solution - hdiutil.
The best part of hdiutil is that you can provide the read-only flag to it. This can be very awesome when it comes to forensics acquisition.


To mount any NAS via SMB:
mount_smbfs afp://<username>@<NAS_IP>/<Share_for_backup> /<mountpoint>

To mount a Time Capsule share via AFP:
mount_afp afp://any_username:password@<Time_Capsule_IP>/<Share_for_backup> /<mountpoint>

And finally this command should do the job:
hdiutil attach test.sparsebundle -readonly

It is nice that you can provide read-only parameter.

If the backup was encrypted and you don't want to provide the password in a password prompt, use the following:
printf '%s' 'CorrectHorseBatteryStaple' | hdiutil attach test.sparsebundle -stdinpass -readonly

Note: if you receive the error "resource temporarily unavailable", probably another machine is backing up to the device

And now, you can find your backup disk under /Volumes. Happy restoring!

Probably it would have been quicker to either enable the remote GUI, or to physically travel to the system and login locally, but that would spoil the fun.Related news
  1. Chema Alonso Libros
  2. Hacking Significado
  3. Manual Del Hacker
  4. Hacking Curso
  5. Hackers Informaticos Contactar
  6. White Hacking
  7. Curso Hacking Etico Gratis
  8. Javascript Hacking

jueves, 21 de mayo de 2020

New Printers Vulnerable To Old Languages

When we published our research on network printer security at the beginning of the year, one major point of criticism was that the tested printers models had been quite old. This is a legitimate argument. Most of the evaluated devices had been in use at our university for years and one may raise the question if new printers share the same weaknesses.

35 year old bugs features

The key point here is that we exploited PostScript and PJL interpreters. Both printer languages are ancient, de-facto standards and still supported by almost any laser printer out there. And as it seems, they are not going to disappear anytime soon. Recently, we got the chance to test a $2,799 HP PageWide Color Flow MFP 586 brand-new high-end printer. Like its various predecessors, the device was vulnerable to the following attacks:
  • Capture print jobs of other users if they used PostScript as a printer driver; This is done by first infecting the device with PostScript code
  • Manipulate printouts of other users (overlay graphics, introduce misspellings, etc.) by infecting the device with PostScript malware
  • List, read from and write to files on the printers file system with PostScript as well as PJL functions; limited to certain directories
  • Recover passwords for PostScript and PJL credentials; This is not an attack per se but the implementation makes brute-force rather easy
  • Launch denial of Service attacks of various kinds:

Now exploitable from the web

All attacks can be carried out by anyone who can print, which includes:
Note that the product was tested in the default configuration. To be fair, one has to say that the HP PageWide Color Flow MFP 586 allows strong, Kerberos based user authentication. The permission to print, and therefore to attack the device, can be be limited to certain employees, if configured correctly. The attacks can be easily reproduced using our PRET software. We informed HP's Software Security Response Team (SSRT) in February.

Conclusion: Christian Slater is right

PostScript and PJL based security weaknesses have been present in laser printers for decades. Both languages make no clear distinction between page description and printer control functionality. Using the very same channel for data (to be printed) and code (to control the device) makes printers insecure by design. Manufacturers however are hard to blame. When the languages were invented, printers used to be connected to a computer's parallel or serial port. No one probably thought about taking over a printer from the web (actually the WWW did not even exist, when PostScript was invented back in 1982). So, what to do? Cutting support for established and reliable languages like PostScript from one day to the next would break compatibility with existing printer drivers. As long as we have legacy languages, we need workarounds to mitigate the risks. Otherwise, "The Wolf" like scenarios can get very real in your office…

More info

John The Ripper


"A powerful, flexible, and fast multi-platform password hash cracker John the Ripper is a fast password cracker, currently available for many flavors of Unix (11 are officially supported, not counting different architectures), DOS, Win32, BeOS, and OpenVMS. Its primary purpose is to detect weak Unix passwords. It supports several crypt(3) password hash types which are most commonly found on various Unix flavors, as well as Kerberos AFS and Windows NT/2000/XP LM hashes. Several other hash types are added with contributed patches. You will want to start with some wordlists, which you can find here or here. " read more...

Website: http://www.openwall.com/john

More information


miércoles, 20 de mayo de 2020

How tO Secure Yourself From Evil Twin Attack

How To Secure Yourself From Evil Twin Attack ?
Hello, in this article you are going to learn how to secure yourself from getting hacked using evil twin attack.

1) Do not connect to any public networks, anyone can sniff your data while you are on a public network.Evil Twin attack will be performed as a public network, so wherever possible restrict connecting to any open or public networks mainly if it wifi name is same as your wifi name

2) When your internet connection suddenly stops working, you might be under DOS attack using evil twin attack, just restart the router and the hacker need to restart the attack and as it takes some time.  Maybe they leave it or continue some other time 

3) Running a VPN to ensure that any browsing and transmitted data is done through an encrypted tunnel that cannot be easily snooped. 

4) Do not always rely on the name of the network, make sure it is a legitimate and trusted network or not. 


Thank You for Reading, Hope It's Useful

@£V£RYTHING NT

Continue reading


  1. Nivel Basico
  2. Hacking Online Games
  3. Rom Hacking Pokemon
  4. Crack Definicion
  5. Aprender Hacking
  6. Google Hacking Database
  7. Chema Alonso Libros
  8. Best Hacking Books
  9. Rom Hacking
  10. Ethical Hacking Certification
  11. Hacking Web Sql Injection
  12. Curso Hacking Etico
  13. Tools Hacking
  14. Crack Definicion
  15. Hacking Significado
  16. Que Es El Hacking

Security Surprises On Firefox Quantum

This morning I've found an scaring surprise on my Firefox Quantum. Casually it was connected to a proxy when an unexpected connection came up, the browser  was connecting to an unknown remote site via HTTP and downloading a ZIP that contains an ELF shared library, without any type of signature on it.

This means two things

1) the owner of that site might spread malware infecting many many people.
2) the ISP also might do that.


Ubuntu Version:


Firefox Quantum version:


The URL: hxxp://ciscobinary.openh264.org/openh264-linux64-0410d336bb748149a4f560eb6108090f078254b1.zip


The zip contains these two files:
  3f201a8984d6d765bc81966842294611  libgmpopenh264.so
  44aef3cd6b755fa5f6968725b67fd3b8  gmpopenh264.info

The info file:
  Name: gmpopenh264
  Description: GMP Plugin for OpenH264.
  Version: 1.6.0
  APIs: encode-video[h264], decode-video[h264]

So there is a remote codec loading system that is unsigned and unencrypted, I think is good to be aware of it.

In this case the shared library is a video decoder, but it would be a vector to distribute malware o spyware massively, or an attack vector for a MITM attacker.


Related articles

CEH: System Hacking, Cracking A Password, Understanding The LAN Manager Hash, NetBIOS DoS Attacks


Passwords are the key element of information require to access the system. Similarly, the first step is to access the system is that you should know how to crack the password of the target system. There is a fact that users selects passwords that are easy to guess. Once a password is guessed or cracked, it can be the launching point for escalating privileges, executing applications, hiding files, and covering tracks. If guessing a password fails, then passwords may be cracked manually or with automated tools such as a dictionary or brute-force method.

Cracking a Password

Passwords are stored in the Security Accounts Manager (SAM) file on a Windows system and in a password shadow file on a Linux system.

Manual password cracking involves attempting to log on with different passwords. The hacker follows these steps:
  1. Find a valid user account (such as Administrator or Guest).
  2. Create a list of possible passwords.
  3. Rank the passwords from high to low probability.
  4. Key in each password.
  5. Try again until a successful password is found.
A hacker can also create a script file that tries each password in a list. This is still considered manual cracking, but it's time consuming and not usually effective.

A more efficient way of cracking a password is to gain access to the password file on a system. Most systems hash (one-way encrypt) a password for storage on a system. During the logon process, the password entered by the user is hashed using the same algorithm and then compared to the hashed passwords stored in the file. A hacker can attempt to gain access to the hashing algorithm stored on the server instead of trying to guess or otherwise identify the password. If the hacker is successful, they can decrypt the passwords stored on the server.

Understanding the LAN Manager Hash

Windows 2000 uses NT LAN Manager (NTLM) hashing to secure passwords in transit on the network. Depending on the password, NTLM hashing can be weak and easy to break. For example, let's say that the password is 123456abcdef . When this password is encrypted with the NTLM algorithm, it's first converted to all uppercase: 123456ABCDEF . The password is padded with null (blank) characters to make it 14 characters long: 123456ABCDEF__ . Before the password is encrypted, the 14-character string is split in half: 123456A and
BCDEF__ . Each string is individually encrypted, and the results are concatenated:

123456A = 6BF11E04AFAB197F
BCDEF__ = F1E9FFDCC75575B15

The hash is 6BF11E04AFAB197FF1E9FFDCC75575B15 .

Cracking Windows 2000 Passwords

The SAM file in Windows contains the usernames and hashed passwords. It's located in the Windows\system32\config directory. The file is locked when the operating system is running so that a hacker can't attempt to copy the file while the machine is booted to Windows.

One option for copying the SAM file is to boot to an alternate operating system such as DOS or Linux with a boot CD. Alternately, the file can be copied from the repair directory. If a system administrator uses the RDISK feature of Windows to back up the system, then a compressed copy of the SAM file called SAM._ is created in C:\windows\repair . To expand this file, use the following command at the command prompt:

C:\>expand sam._ sam

After the file is uncompressed, a dictionary, hybrid, or brute-force attack can be run against the SAM file using a tool like L0phtCrack. A similar tool to L0phtcrack is Ophcrack.

Download and install ophcrack from http://ophcrack.sourceforge.net/

Redirecting the SMB Logon to the Attacker

Another way to discover passwords on a network is to redirect the Server Message Block (SMB) logon to an attacker's computer so that the passwords are sent to the hacker. In order to do this, the hacker must sniff the NTLM responses from the authentication server and trick the victim into attempting Windows authentication with the attacker's computer.

A common technique is to send the victim an email message with an embedded link to a fraudulent SMB server. When the link is clicked, the user unwittingly sends their credentials over the network.

SMBRelay

An SMB server that captures usernames and password hashes from incoming
SMB traffic. SMBRelay can also perform man-in-the-middle (MITM) attacks.

SMBRelay2

Similar to SMBRelay but uses NetBIOS names instead of IP addresses to capture usernames and passwords.

pwdump2

A program that extracts the password hashes from a SAM file on a Windows system. The extracted password hashes can then be run through L0phtCrack to break the passwords.

Samdump

Another program that extracts NTLM hashed passwords from a SAM file.

C2MYAZZ

A spyware program that makes Windows clients send their passwords as clear text. It displays usernames and their passwords as users attach to server resources.

NetBIOS DoS Attacks

A NetBIOS denial-of-service (DoS) attack sends a NetBIOS Name Release message to the NetBIOS Name Service on a target Windows systems and forces the system to place its name in conflict so that the name can no longer be used. This essentially blocks the client from participating in the NetBIOS network and creates a network DoS for that system.
  1. Start with a memorable phrase, such as "Maryhadalittlelamb"
  2. Change every other character to uppercase, resulting in "MaRyHaDaLiTtLeLaMb"
  3. Change a to @ and i to 1 to yield "M@RyH@D@L1TtLeL@Mb"
  4. Drop every other pair to result in a secure repeatable password or "M@H@L1LeMb"

Now you have a password that meets all the requirements, yet can be "remade" if necessary. Read more

Top 5 Most Useful Linux Tools For Programmers

Top 5 most useful linux tools for Programmer

Linux is a free and open-source software operating systems built around the Linux kernel. It typically packaged in a form known as a Linux distribution for both desktop and server use. It is a great development environment for programmers and developers. However, without the development tools, that would be impossible. Fortunately, plenty of Linux tools are available. Here are the top 5 most useful Linux tools for programmers.

Also Read;-  How To Clone One Android To Another

5 Most Useful Linux tools for Programmers

1. VIM

vim editor-compressed
VIM is a free and open source software written by Bram Moolenaar in 1991. It is designed for use both from a command-line interface and as a standalone application in a graphical user interface. It comes standard with almost every Linux distribution and is also known as "the programmer's editor". VIM is great for coding and can also be used for editing things like configuration files and XML documents.
Vim has been developed to be a cross-platform that supports many other platforms. In 2006, it was voted as the most popular editor amongst Linux Journal readers. In 2015, Stack Overflow developer survey found it to be the third most popular text editor while in 2016, the Stack Overflow developer survey found it to be the fourth most popular development environment.
Read more;-  How To Use WhatsApp without Mobile No

2. Zsh

Zsh is written in C and initially released in 1990. It is a Unix shell that can be used as an interactive login shell and as a powerful command interpreter for shell scripting. Zsh is an extended version of Bourne shell (BASH) with a large number of improvements, including some features of Bash, ksh, and tcsh. Zsh gives a user-friendly experience on the command line. It also gives better auto-completion, Vim key bindings, and smart guesses when you write a command wrong.
Its features include (but not limited to):
  • Programmable command-line completion,
  • Sharing of command history among all running shells
  • Extended file globbing
  • Improved variable/array handling
  • Editing of multi-line commands in a single buffer
  • Spelling correction
  • Various compatibility modes,
  • Themeable prompts, and
  • Loadable modules.

3. Byobu

It was initially released in 2009 written in Sh and Python. Byobu can be used to provide on-screen notification or status and tabbed multi-window management. Thus, it is intended to improve terminal sessions when users connect to remote servers with an operating system Linux and Unix-like. It is is an enhancement for the GNU Screen terminal multiplexer or tmux used with the GNU/Linux computer operating system.

4. GIT

git commandsGit was initially released on April 7, 2005. It is a version control system to track changes in computer files and to coordinate work on those files among multiple people. It is primarily used for source code management in software development and can be used to keep track of changes in any set of files available in the English language. It is aimed at speed, data integrity, and support for distributed, non-linear workflows. It is free and open source software distributed under the terms of the GNU General Public License version 2.
Moreover, Linus Torvalds was the creator of GIT for the development of the Linux kernel. On the other hand, its current maintainer since then is Junio Hamano. Thus, every Git directory on every computer is a full-fledged repository with complete history and full version tracking abilities, independent of network access or a central server.

5. Docker

Written by Solomon Hykes in 2013, it is a computer program that performs operating-system-level virtualization, the containerization, which is developed by Docker, Inc. Primarily, Docker was developed for Linux to use as the resource isolation features of the Linux kernel. It is a tool that can package an application and its dependencies in a virtual container that can run on any Linux server. This helps enable the flexibility and portability on where the application can run, whether on premises, public cloud, private cloud, bare metal, etc.  Moreover, it accesses the Linux kernel's virtualization features either directly using the libcontainer library.
Read more
  1. Ethical Hacking Course
  2. Life Hacking
  3. Herramientas Hacking
  4. Funnel Hacking Live
  5. Hacking Etico Pdf
  6. Aprender Hacking
  7. Hacking Social
  8. Amiibo Hacking
  9. Ultimate Hacking Keyboard
  10. Hacking Linux
  11. Ingeniería Social. El Arte Del Hacking Personal Pdf
  12. Linux Hacking Distro

How To Protect Your Private Data From Android Apps

protect-private-data-from-apps
In android there is lots of personal data that can be accessed by any unauthorized apps that were installed on the device. This is just because your Android data is openly saved in your file explorer that is not encrypted or protected by encryption method, so, even normal app can also hijack your data very easily as the media access permissions are granted when you click on accept button while installing the apps. And this may be endangering the private data that you might not want to share with anyone. So here we have a cool way that will help you to make your data private by disallowing the apps to access your media files without your permission. So have a look on complete guide discussed below to proceed.

How To Protect Your Private Data From Android Apps

The method is quite simple and just need a rooted android device that will allow the Xposed installer to run on the device. And after having the Xposed installer you will be using an Xposed module to disallow the apps to have access to your personal or say private data. For this follow the guide below.

Steps To Protect Your Private Data From Android Apps:

Step 1. First of all, you need a rooted android as Xposed installer can only be installed on a rooted android, so Root your android to proceed for having superuser access on your android.
Step 2. After rooting your Android device you have to install the Xposed installer on your android and thats quite lengthy process and for that, you can proceed with our Guide to Install Xposed Installer On Android.Xposed Installer
Step 3. Now after having an Xposed framework on your Android the only thing you need is the Xposed module that is DonkeyGuard – Security Management the app that will allow you to manage the media access for apps installed on your device.
Step 4. Now install the app on your device and after that, you need to activate the module in the Xposed installer. Now you need to reboot your device to make the module work perfectly on your device.
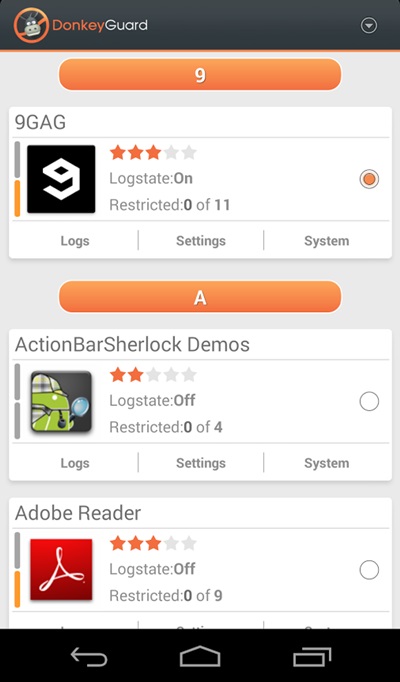
Step 5. Now launch the app and you will see all the apps that are currently installed on your device.
privacy 1
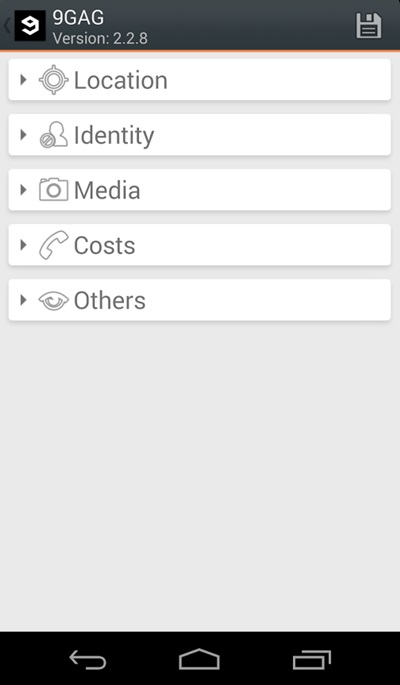
Step 6. Now edit the media permission for the apps that you don't want to have access to your media with private data.privacy 2
That's it, you are done! now the app will disallow the media access to that apps.

Manually Checking App Permission

Well, our Android operating system offers a nice feature in which we can manage a single app's permission. However, you need to have Android 6.0 Marshmallow or a newer version to get the option.
Step 1. First of all, open Settings and then tap on 'Apps'.
Manually Checking App Permission
Step 2. Now you will see the list of apps that are currently installed on your Android smartphone. Now you need to select the app, and then you will see 'Permissions.'
Manually Checking App Permission
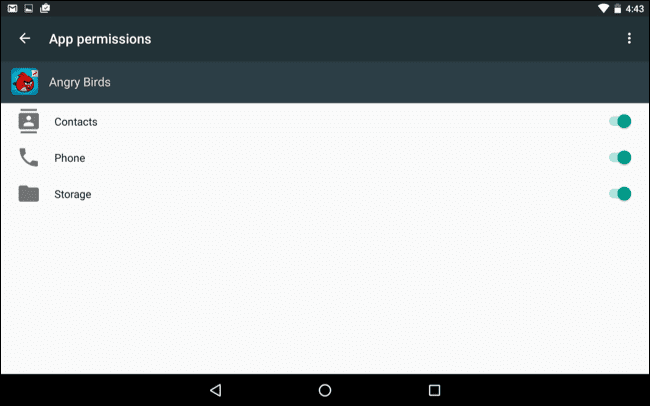
Step 3. Now it will open a new window, which will show you all permissions that you have granted to the app like Camera access, contacts, Location, microphone, etc. You can revoke any permissions as per your wish.
Manually Checking App Permission
Well, the same thing you need to perform if you feel that you have installed some suspicious app on your Android. By this way, you can protect your private data from Android apps.

Related posts


  1. El Hacker Pelicula
  2. Growth Hacking
  3. Hacking Movies
  4. Hacking Programs
  5. Paginas De Hackers
  6. Capture The Flag Hacking
  7. Hacking Cracking

DiscordRAT - Discord Remote Administration Tool Fully Written In Python


Discord Remote Administration Tool fully written in Python3.
This is a RAT controlled over Discord with over 20 post exploitation modules.

Disclaimer:
This tool is for educational use only, the author will not be held responsible for any misuse of this tool.
This is my first project on github as such this project is far from perfect , I will listen to any criticism as long as it is constructive.

Setup Guide:
You will first need to register a bot with the Discord developper portal and then add the bot to the server that you want. Once the bot is created copy the token of your bot and paste it at line 11.
Now on go on discord , go to the settings , go to appearance , scroll to the bottom , and activate "Developer Mode",now go to the server where your bot added right click on the channel where you want the bot to post , click copy ID and finally , paste the ID in the parenthesis in line 99.
Install requirements ("pip3 install -r requirements.txt")
Then if steps above were succesful after launching the python file, or executable , it will post a message on the server with a generated uuid , all that is left to do is posting "!interact " with the given uuid.
Now your bot should be available to use !
Requirements:
Python3,Windows
Compiling to exe (optional):
If you want to compile the bot to exe you can use PyInstaller.
Inside the directory of the bot execute "PyInstaller --onefile --noconsole DiscordRAT.py" or "python3 -m PyInstaller --onefile --noconsole DiscordRAT(NoCV).py (or DiscordRAT.py)"
If an error occured during compiling try to import the discord module "PyInstaller --onefile --noconsole --hidden-import=discord DiscordRAT.py"
Advice:
If you have problems with the installation of win32api or other modules , try installing it in a python virtual environment.
There are two python files one has opencv and webcam related modules the other does not, this has been done because open-cv adds multiple dozens of megabytes to the compiled .exe file.


via KitPloitMore articles

martes, 19 de mayo de 2020

HACK SNAPCHAT ACCOUNT BY MAC SPOOFING

In the last article, I have discussed a method on how to hack SnapChat account using SpyStealth Premium App. In this article, I am gonna show you an advanced method that how to hack SnapChat account by mac spoofing. It works same as WhatsApp hacking by mac spoofing. It's a bit more complicated than the last method discussed and requires proper attention. It involves the spoofing of the mac address of the target device. Let's move on how to perform the attack.

HOW TO HACK SNAPCHAT ACCOUNT BY MAC SPOOFING?

Note: This method will work if SnapChat is created on a phone number.
Here I will show you complete tutorial step by step of hacking the SnapChat account. Just understand each step carefully.
  1. Find out the victim's phone and note down it's Mac address. To get the mac address in Android devices, go to Settings > About Phone > Status > Wifi Mac address. And here you'll see the mac address. Just write it somewhere. We'll use it in the upcoming steps.
  2. As you get the target's mac address, you have to change your phone's mac address with the target's mac address. Perform the steps mentioned in this article on how to spoof mac address in android phones.
  3. Now install SnapChat on your phone and use victim's number while you're creating an account. It'll send a verification code to victim's phone. Just grab the code and enter it here.
  4. Once you do that, it'll set all and you'll get all chats and messages which victims sends or receives.
This method is really a good one but very difficult for the non-technical users. Only use this method if you're technical skills and have time to perform every step carefully. Otherwise, you can hack SnapChat account using Spying app.
Related word

  1. Curso Hacking Etico Gratis
  2. Hacking Informatico
  3. Hacker En Español
  4. Hardware Hacking
  5. Car Hacking
  6. Nivel Basico
  7. Growth Hacking Ejemplos
  8. Hacking Bluetooth Speaker
  9. Codigo Hacker
  10. Hacking Pdf
  11. Wargames Hacking
  12. Best Hacking Books

HOW TO BECOME A CERTIFIED ETHICAL HACKER

7 Tips to become a hacker?
It is very important for a hacker to learn different types of programming language such as C,C++,Python,Java,PHP etc and it is also necessary to learn hardware and networking for a good hacker because these skill are very useful to become a successful hacker.

1-Programming Language are essential to becoming a good hacker 

2-Networking skills is important to becoming an effective hacker.

3-SQL language are essential to becoming an effective hacker 

4-Internet surfing is also essential for becoming a hacker for gathering information.

5-Cryptography is essential to becoming a certified hacker from which a hacker can share his/her readable data to other person in a nonreadable form with the help of Cryptography.

6-Penetration testing  is also important for a hacker.

7-experiment a lot is also very useful to becoming a ethical hacker.

Follow me on insta_anoymous_adi
Continue reading
  1. El Libro Del Hacker
  2. Hacking The Art Of Exploitation
  3. Social Hacking
  4. Body Hacking
  5. Mind Hacking
  6. Hacking Usb
  7. Reddit Hacking
  8. El Hacker
  9. Hacking Tutorials
  10. Hacking Hardware Tools